How To Create An Ergonomic Study Setup
We may earn a commission for purchases made using our links. Please see our disclosure to learn more.
An ergonomic study setup is the key to staying comfortable, focused, and pain-free during long study hours. Many students experience neck strain, wrist pain, or back discomfort without realizing it’s caused by poor posture and an unbalanced workspace. What’s great is that even minor changes, like bringing your monitor up to eye level, can have a big impact. With an ergonomic setup that supports your body, you’ll study longer, focus better, and feel more energized at the end of the day. In this guide, you’ll learn simple step-by-step tips to adjust your chair, desk, monitor, lighting, and movement routine for a setup that keeps you comfortable and productive.
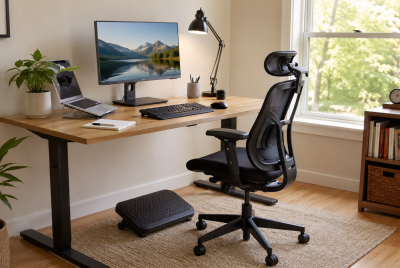
Step 1: Start With Your Chair — The Foundation of Ergonomics
Your chair does more than hold you up — it shapes how you sit. A good ergonomic chair supports your back, keeps your body aligned, and helps prevent long-term discomfort.
Here’s how to set it up:
- Adjust the height: Make sure your feet are flat on the surface of the floor. If they dangle, use a footrest.
- Find your ideal angle: Keep your knees at a 90-degree angle, level with or slightly below your hips.
- Support your spine: Sit so your lower back touches the chair’s backrest. Add a lumbar cushion if you feel a gap between your spine and the chair.
- Relax your arms: Your elbows should bend at a natural 90-degree angle, with your shoulders relaxed — not hunched.
A high-quality chair can make or break your comfort. If you’re looking for a reliable option, check out this Ergonomic Mesh Desk Chair that blends breathability, adjustability, and lower-back support.

Step 2: Set Your Desk to the Right Height
Next comes your desk — your workspace anchor. Its height determines how comfortable your arms, shoulders, and wrists feel throughout the day.
Follow these tips to find your ideal setup:
- Arm position matters: Sit down and rest your arms naturally. The desk should be at a height that allows your elbows to remain at a 90-degree angle without forcing your shoulders up.
- Avoid wrist strain: Keep your wrists straight, not bent upward or downward, when typing or writing.
- Mind your space: Make sure there’s enough legroom beneath your desk to stretch and move comfortably.
If your desk feels too tall and can’t be adjusted, a height-adjustable chair and footrest combo is your best fix. For long study hours, a sit-stand desk can also help you alternate between sitting and standing, improving blood flow and focus.
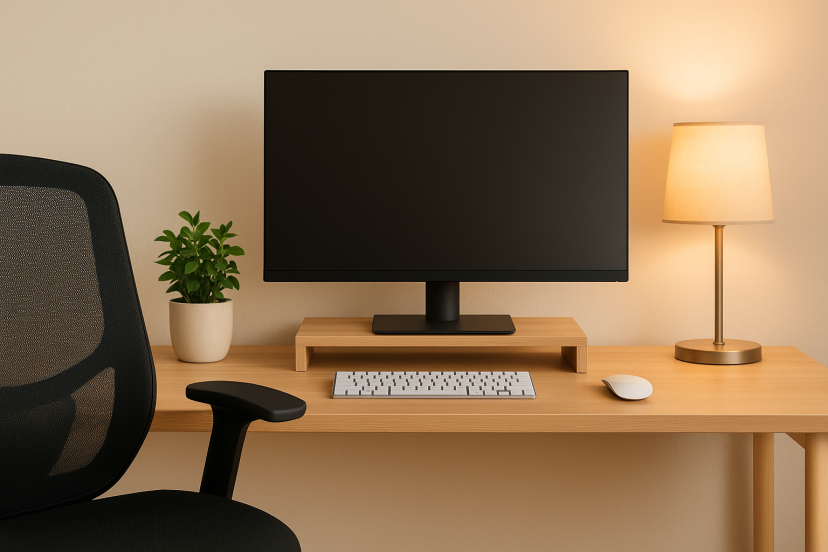
Step 3: Position Your Monitor for Eye-Level Comfort
Your screen placement can make a world of difference. If it’s too high, your neck will be strained. Too low, and you end up slouching forward — a posture killer.
Here’s how to position it perfectly:
- Distance: Keep your screen roughly an arm’s length away.
- Height: Position the top edge of your screen so it sits right at, or just slightly below, your eye level to keep your neck and shoulders relaxed.
- Angle: A gentle tilt of around 10 to 20 degrees makes viewing easier on your eyes and prevents neck strain.
- Lighting: Avoid glare by keeping your monitor perpendicular to windows or light sources.
If you’re using a laptop, don’t keep it flat on your desk. Raise it using a laptop stand or a stack of sturdy books, and connect an external keyboard and mouse. This small tweak instantly improves posture and reduces neck strain.
Studies published in Applied Ergonomics show that correct monitor height and viewing distance can reduce neck and shoulder strain by up to 30%.
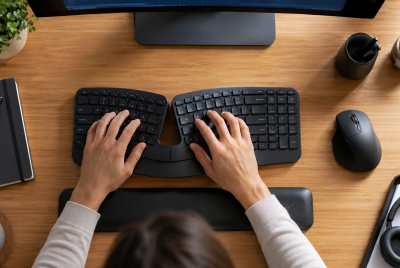
Step 4: Arrange Your Keyboard and Mouse the Right Way
It’s easy to overlook your keyboard and mouse, but their placement directly affects your wrists and shoulders.
Here’s the best ergonomic setup:
- Keep your keyboard close to the edge of the desk so your forearms can rest comfortably.
- Maintain a straight wrist position — no bending up, down, or sideways.
- To prevent reaching, keep your mouse next to your keyboard.
- Consider using an ergonomic keyboard and mouse designed to reduce wrist tension.
If you spend long hours typing, try using a gel wrist rest to support your hands. According to a 2021 study in the Journal of Occupational Health, keeping wrists in a neutral position reduces muscle fatigue by 25% and improves long-term comfort during repetitive tasks.
Step 5: Light It Right — Your Eyes Will Thank You
Lighting is one of the most underestimated aspects of a study setup. Poor lighting strains your eyes, causes headaches, and lowers your productivity.
Here’s how to fix that:
- Maximize natural light: Place your desk near a window but not directly facing it to avoid glare.
- Use a quality desk lamp: Opt for an LED desk lamp with adjustable brightness and a flexible neck.
- Avoid overhead glare: If your room has harsh ceiling lights, balance it with softer lighting from the side.
- Mind your monitor brightness: Customize the screen’s brightness to the amount of light in the room.
One of the best options available is the BenQ e-Reading LED Desk Lamp, which automatically adjusts brightness to suit your environment. It’s a small upgrade that makes a big difference during nighttime study sessions.

Step 6: Keep Things Organized and Clutter-Free
A clean desk equals a clear mind. Clutter not only distracts you but also forces awkward postures when you constantly reach for misplaced items.
Try these quick organization hacks:
- Use cable clips or a cable box to keep cords neat.
- Store stationery and gadgets in easy-to-reach drawers or desk organizers.
- Keep your most-used items (like your notebook or water bottle) within arm’s reach.
- Add a small plant — greenery reduces stress and increases productivity by up to 15%, according to a study from the Journal of Environmental Psychology.
Minimal clutter doesn’t just look better — it feels better. Your workspace becomes a calm zone for focus and flow.
Step 7: Move, Stretch, and Take Microbreaks
Even the most ergonomic setup can’t replace movement. Sitting still for hours slows circulation and tightens your muscles.
To stay energized:
- Follow the 20-8-2 rule: For every 30 minutes, sit for 20, stand for 8, and move for 2.
- Do quick stretches: Roll your shoulders, stretch your wrists, and stand up to reset your posture.
- Blink often: Every 20 minutes, spend about 20 seconds focusing on something roughly 20 feet away to relax your vision and avoid fatigue.
These small habits can dramatically reduce fatigue and help your brain refocus faster between study blocks.
Step 8: Personalize Your Study Space
An ergonomic setup should still feel like you. Beyond comfort, personalization boosts motivation and mood.
- Add soft lighting or a scented candle for ambiance.
- Use a color palette that feels calm (think beiges, greys, or pastels).
- Decorate with minimal but meaningful items — a favorite quote, a photo, or a small piece of art.
- Keep a reusable water bottle nearby to stay hydrated — posture and hydration go hand in hand.
Remember: an ergonomic study setup isn’t just physical; it’s emotional too. A personalized, pleasant environment helps you feel more grounded and less anxious.
5 Ergonomic Upgrades You Need
- SIHOO Doro C300 Ergonomic Office Chair – Adjustable headrest, breathable mesh, and lumbar support for all-day comfort.
- ErGear Electric Standing Desk – Smooth height adjustment and strong frame for sit-stand flexibility.
- Soundance Laptop Stand – Raises your laptop to eye level and improves airflow.
- Logitech MX Keys & MX Master 3 Combo – Quiet, responsive, and designed for wrist comfort.
- BenQ e-Reading LED Desk Lamp – Flicker-free, adaptive lighting for healthier study sessions.
Why a Smarter Setup Means a Sharper Mind
When your body is properly supported, your mind performs better. That’s not just common sense; it’s physiology in action.
A 2019 NIH-backed ergonomic intervention study found that people who adjusted their workstations to match ergonomic guidelines experienced a clear reduction in neck, shoulder, and upper-back discomfort. But that’s not all — participants also showed measurable improvements in focus and productivity after just a few weeks. The researchers noted that when strain is reduced, mental clarity naturally increases. Think of it as freeing up your brain from the constant background noise of physical tension.
Supporting that idea, a systematic review on ergonomic interventions and musculoskeletal pain published in the Journal of Clinical Medicine analyzed data from 24 trials and concluded that ergonomic improvements — like better chairs, screen adjustments, and posture training — led to significant drops in discomfort and fatigue. Students and professionals alike benefited from enhanced concentration and energy levels during long study or work sessions.
In other words, when your environment works with your body instead of against it, everything feels easier — from maintaining posture to staying focused on complex material. The science is clear: investing in an ergonomic study setup isn’t about luxury. It’s about creating the conditions where your body and mind can thrive together.
Conclusion
A truly ergonomic study setup goes beyond aesthetics. It’s about creating a space that supports your body, sharpens your focus, and sustains your energy through every session. When your chair, desk, and screen are properly aligned, studying becomes less about fighting discomfort and more about flowing through your work with ease. Small adjustments, like setting your monitor at eye level or keeping your feet flat on the floor, can drastically improve how you feel and perform. Ultimately, it’s a smart investment in your health, productivity, and long-term learning success.
FAQs
1. How to do an ergonomic study setup?
Start by adjusting your chair, desk, and monitor to support your natural posture. Keep your back straight, feet flat, and take short breaks every hour.
2. How to make your setup ergonomic?
Align your screen at eye level, use a supportive chair, and maintain neutral wrist positions. A few small adjustments can prevent long-term pain.
3. What is an ergonomic setup?
It’s a workspace designed to fit your body’s natural movements, minimizing strain and maximizing comfort and focus.
4. What are the four types of ergonomics?
They include physical ergonomics (body posture), cognitive ergonomics (mental workload), organizational ergonomics (workflow), and environmental ergonomics (lighting and noise).
5. What are examples of ergonomic equipment?
Ergonomic chairs, standing desks, monitor risers, footrests, and adjustable keyboards are all great examples.